Jenkins + gitops
Jenkins란?

▶ 다른 일상적인 개발 작업을 자동화할 뿐 아니라 파이프라인(Pipeline)을 사용해 거의 모든 언어의 조합과 소스코드 리포지토리에 대한 지속적인 통합과 지속적인 전달 환경을 구축하기 위한 간단한 방법을 제공
▶ 빌드, 테스트, 배포 등 모든 것을 자동화해주는 자동화 서버
Credentials Plugin?
- Jenkins는 단지 서버일 뿐 배포에 필요한 각종 리소스에 접근하기 위해서는 여러가지 중요 정보들을 저장하고 있어야 한다.
즉 권한을 주는거다. ⇒ AWS tokeen, Git access token … 이런것들을 저장. - 보안상 안전한가?
⇒이것들 모두 공개키방식의 암호화가 자동으로 진행되기 때문에 안전하다
젠킨스 서버 생성
- 젠킨스 서버용 AWS EC2 인스턴스 생성
플랫폼은 Amazon Linux를 선택
보안그룹에서 인바운드 규칙을 다음과 같이 설정한다.

ec2 인스턴스 생성 완료

젠킨스 실행 / 설정
- 젠킨스 실행 전 준비작업
sudo yum update -y
sudo yum upgrade -y

# Jenkins 패키지 추가
sudo wget -O /etc/yum.repos.d/jenkins.repo https://pkg.jenkins.io/redhat-stable/jenkins.repo
sudo rpm --import https://pkg.jenkins.io/redhat-stable/jenkins.io-2023.key

# 필요항목들 다운로드 ( java, jenkins, git, python, docker )
sudo amazon-linux-extras install java-openjdk11 -y
sudo yum install jenkins -y
sudo yum install git -y
sudo yum install python3
sudo yum install docker -y- 젠킨스 실행
sudo systemctl enable jenkins
sudo systemctl start jenkins

# Jenkins의 현재 상태 확인
sudo systemctl status jenkins

# Jenkins 초기 비밀번호 확인
sudo cat /var/lib/jenkins/secrets/initialAdminPassword- 플러그인 다운로드
초기 화면에 나오는 recommended plugins로 설치해준다.

완료되었으면 [Jenkins 관리 → Plugins]에서 추가로 필요한 플러그인들을 설치해준다.
docker-build-step / Docker plugin / Docker Pipeline / AWS ECR
아래의 이미지 참고


- Jenkins와 Github 연동
젠킨스가 해당 리소스들에 접근하기 위해서는 당연히 접근 권한이 필요하다. 이를 위한 작업이다.

현재는 이렇게 4가지 Credential들을 등록해놓았다.
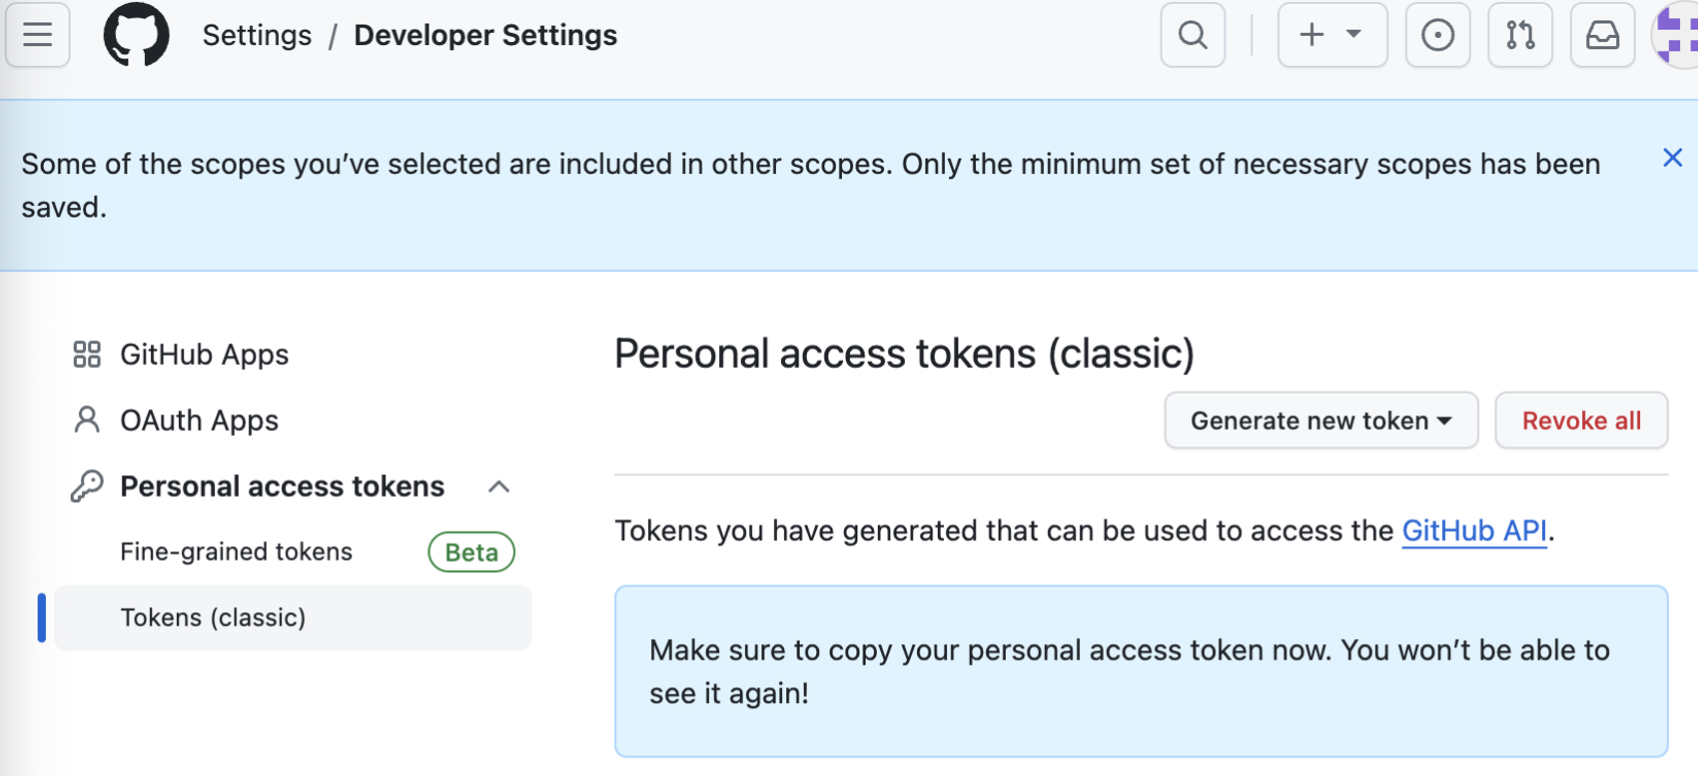
github-token
https://jenakim47.tistory.com/73
깃허브의 Settings → Developer Settings → Personal access tokens → Tokens 에서 Generate new token을 통해 토큰을 생성하고, 생성된 값을 복사한다.
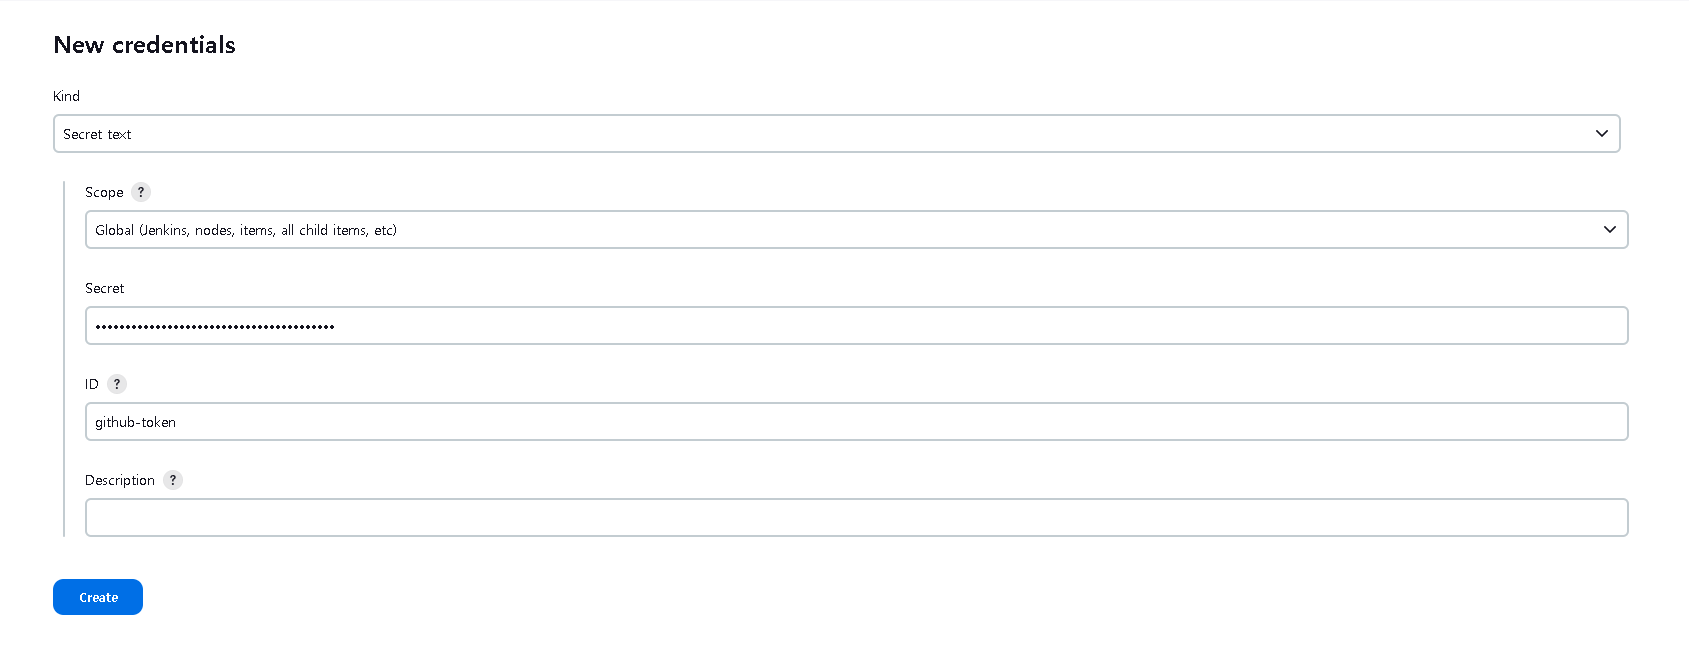
New credentials를 클릭하고, Kind는 Secret text를 선택,
username에는 깃허브 id를, Password에는 복사한 토큰 값을 입력해주면 된다.
github-signin 또한 github에 Jenkins가 접근 할 수 있도록 해주는 Credential인데, 위와 같이 Username에는 깃허브 id를, Password에는 깃허브의 비밀번호를 입력해주면 된다. Kind는 Username and Password를 선택해준다.

ecr credential
다음은 ecr에 접근하기 위한 credential이다. ECR 레포지토리를 생성하고, Add Credential을 누른 후
IAM에서 Access Key와 Secret Access Key를 발급받아 입력해준다.

AWS ECR에 접근하기 위한 Credential

github system 연결


(slack jenkins 연결) 자세한건 뒤에 나와있다.
https://dnight.tistory.com/entry/Jenkins-Slack-알림-연동


pipeline
newitem > pipeline 생성

- github project에 url 입력
- poll SCM 을 통해 /3 * * * * 입력
- /3 * * * * → 3분마다 체크

- pipeline script from scm 설정
- scm → git
- repositiries 설정후 크리덴셜 지정
- 브랜치 설정
💡 troble shooting
default 값이 master이며 브런치 값을 정확이 확인해준다.

💡 troble shooting
script path가 기본으로 Jenkinsfile 로 되어있다.
이때 지정해준 github 레퍼지토리의 정확한 경로와 파일이름을 정해준다.
- 예시 jenkinsfile (본 jenkinsfile은 쿠버네티스를 위한 목적으로 argocd 및 trivy slack 등 다양한 서비스를 접목시킨 코드이다.)
pipeline {
  agent any

  triggers {
    pollSCM('*/3 * * * *')
  }

  environment {
    REPOSITORY_CREDENTIAL_ID = 'github-signin'
    REPOSITORY_URL = 'https://github.com/wpgur/JOONGSINT.git'
    TARGET_BRANCH = 'main'

    CONTAINER_NAME = 'TestOsintflask'


    AWS_CREDENTIAL_NAME = 'wpgur-ecr'

    ECR_PATH = '871065065486.dkr.ecr.us-east-2.amazonaws.com'
    IMAGE_NAME = '871065065486.dkr.ecr.us-east-2.amazonaws.com/jenkinsflask'
    REGION = 'us-east-2'
  }

  stages{
    stage('init') {
      steps {
        echo 'init stage'
        deleteDir()
      }
      post {
        success {
          echo 'Success init in pipeline'
        }
        failure {
          error 'fail init in pipeline'
        }
      }
    }

    stage('clone project') {
      steps {
        git url: "$REPOSITORY_URL",
        branch: "$TARGET_BRANCH",
        credentialsId: "$REPOSITORY_CREDENTIAL_ID"
        sh "ls -al"
      }
      post {
        success {
          echo 'success clone project'
        }
        failure {
          error 'fail clone project' // exit pipeline
        }
      }
    }

    stage('Build project') {
      steps {
        sh '''
        pip3 install --upgrade pip
        pip3 install -r requirements.txt
        pip3 install flask
        python3 main.py &
        '''
      }
      post {
        success {
          echo 'successfully build!'
        }
        failure {
          error 'fail to build project'
        }
      }
    }

    stage('dockerizing project') {
      steps {
        sh '''
        docker build -t $IMAGE_NAME:$BUILD_NUMBER .
        docker tag $IMAGE_NAME:$BUILD_NUMBER $IMAGE_NAME:latest
        '''
      }
      post {
        success {
          echo 'success dockerizing project'
        }
        failure {
          error 'fail dockerizing project'
          }
        }
      }


    stage('upload aws ECR') {
      steps {
        script {
          //cleanup cureent user docker credentials
          sh 'rm -f ~/.dockercfg ~/.docker/config.json || true'

          docker.withRegistry("https://${ECR_PATH}", "ecr:${REGION}:${AWS_CREDENTIAL_NAME}") {
            docker.image("${IMAGE_NAME}:${BUILD_NUMBER}").push()
            docker.image("${IMAGE_NAME}:latest").push()
          }

        }
      }
      post {
        success {
          echo 'success upload image'
        }
        failure {
          error 'fail upload image'
        }
      }
    }

    stage('Trivy Scan') {
      steps {
        script {
          // Save the result to a variable
          trivyResult = sh(script: """
              date '+%Y-%m-%d %H:%M:%S' && trivy image --quiet --format template --template '{{- \$critical := 0 }}{{- \$high := 0 }}{{- range . }}{{- range .Vulnerabilities }}{{- if eq .Severity "CRITICAL" }}{{- \$critical = add \$critical 1 }}{{- end }}{{- if eq .Severity "HIGH" }}{{- \$high = add \$high 1 }}{{- end }}{{- end }}{{- end }}Critical: {{ \$critical }}, High: {{ \$high }}' 871065065486.dkr.ecr.us-east-2.amazonaws.com/jenkinsflask
          """, returnStdout: true).trim()

          // Print the result to the console
          echo "Trivy Scan Result: ${trivyResult}"

          // Send the result to Slack
          slackSend channel: '#devops-trivy-check', color: '#FF5733', message: "Trivy Scan Result: ${trivyResult}", teamDomain: 'devops-lcz1131', tokenCredentialId: 'slack_jenkins'
        }
      }
    }


    //도커 이미지 태그를 깃허브에 push
    stage('Deploy') {
      steps{
      sh('''
          git config --global user.name "wpgur"
          git config --global user.email "wpgur0510@naver.com"
          git checkout -b dev
      ''')


        script {
          previousTAG = sh(script: 'echo `expr ${BUILD_NUMBER} - 1`', returnStdout: true).trim()
        }

        withCredentials([usernamePassword(credentialsId: 'github-signin', usernameVariable: 'GIT_USERNAME', passwordVariable: 'GIT_PASSWORD')]) {
            sh('''
              #!/usr/bin/env bash
              git config --local credential.helper "!f() { echo username=\\$GIT_USERNAME; echo password=\\$GIT_PASSWORD; }; f"
              echo ${previousTAG}
              sed -i "s|${ECR_PATH}.*|${ECR_PATH}/jenkinsflask:${BUILD_NUMBER}|g" manifest/flask-deployment.yaml
              git add manifest/flask-deployment.yaml
              git status
              git commit -m "update the image tag"
              git push -f origin dev
            ''')
        }
      }
    }
  }
}
젠킨스 서버 테라폼으로 구축
사전 준비
ec2_key.pem
해당 인스턴스를 생성하고 관리하기 위해서는 aws ec2_key를 발급받아야하며 다음과 같이 발급할수 있다.
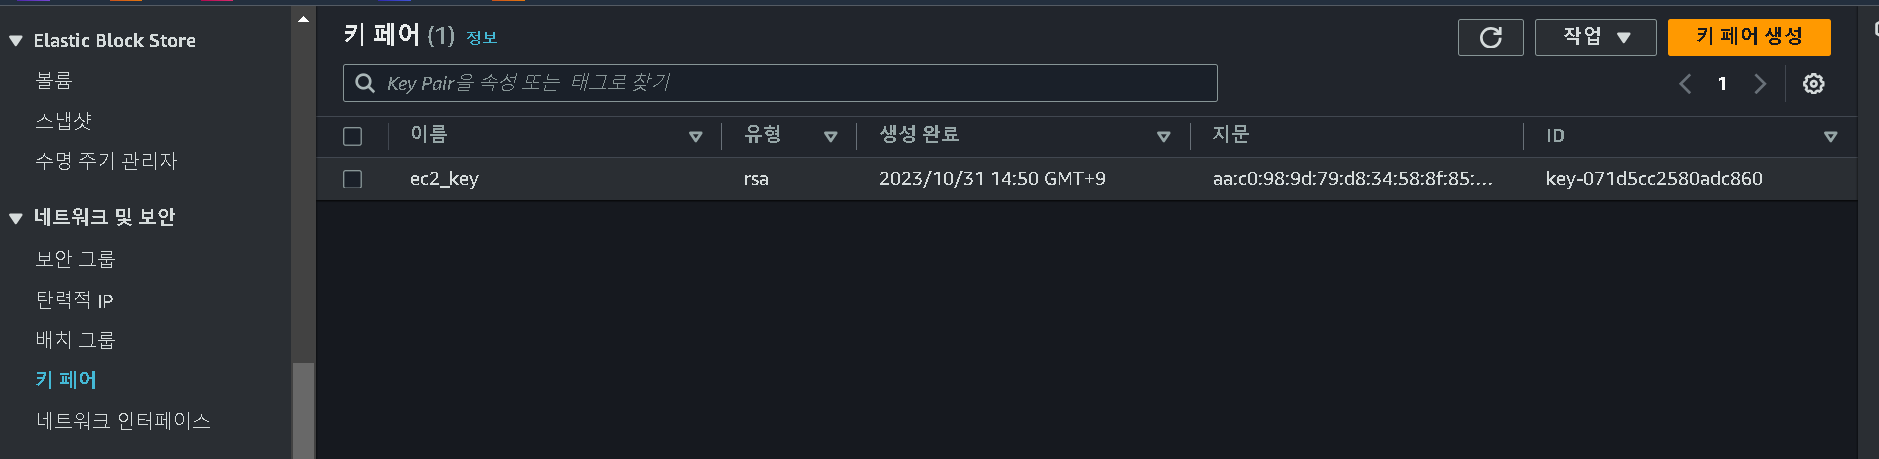
다음과 같이 생성한다음 다운받아 둔다.
- jenkins.tf
  # configured aws provider with proper credentials
  provider "aws" {
    region    = "us-east-2"
  }

  # create default vpc if one does not exit
  resource "aws_default_vpc" "default_vpc" {

    tags    = {
      Name  = "default vpc"
    }
  }

  # use data source to get all avalablility zones in region
  data "aws_availability_zones" "available_zones" {}

  # create default subnet if one does not exit
  resource "aws_default_subnet" "default_az1" {
    availability_zone = data.aws_availability_zones.available_zones.names[0]

    tags   = {
      Name = "default subnet"
    }
  }

  # create security group for the ec2 instance
  resource "aws_security_group" "ec2_security_group" {
    name        = "ec2 security group"
    description = "allow access on ports 8080 and 22"
    vpc_id      = aws_default_vpc.default_vpc.id

    # allow access on port 8080
    ingress {
      description      = "http proxy access"
      from_port        = 8080
      to_port          = 8080
      protocol         = "tcp"
      cidr_blocks      = ["0.0.0.0/0"]
    }

    # allow access on port 22
    ingress {
      description      = "ssh access"
      from_port        = 22
      to_port          = 22
      protocol         = "tcp"
      cidr_blocks      = ["0.0.0.0/0"]
    }

    egress {
      from_port        = 0
      to_port          = 0
      protocol         = -1
      cidr_blocks      = ["0.0.0.0/0"]
    }

    tags   = {
      Name = "jenkins server security group"
    }
  }

  # use data source to get a registered amazon linux 2 ami
  data "aws_ami" "amazon_linux_2" {
    most_recent = true
    owners      = ["amazon"]

    filter {
      name   = "owner-alias"
      values = ["amazon"]
    }

    filter {
      name   = "name"
      values = ["amzn2-ami-hvm*"]
    }
  }

  # launch the ec2 instance and install website
  resource "aws_instance" "ec2_instance" {
    ami                    = data.aws_ami.amazon_linux_2.id
    instance_type          = "t3.xlarge"
    subnet_id              = aws_default_subnet.default_az1.id
    vpc_security_group_ids = [aws_security_group.ec2_security_group.id]
    key_name               = "ec2_key"
    # user_data            = file("install_jenkins.sh")

    tags = {
      Name = "jenkins server"
    }
  }

  # an empty resource block
  resource "null_resource" "name" {

    # ssh into the ec2 instance
    connection {
      type        = "ssh"
      user        = "ec2-user"
      private_key = file("ec2_key.pem")
      host        = aws_instance.ec2_instance.public_ip
    }

    # copy the install_jenkins.sh file from your computer to the ec2 instance
    provisioner "file" {
      source      = "install_jenkins.sh"
      destination = "/tmp/install_jenkins.sh"
    }

    # set permissions and run the install_jenkins.sh file
    provisioner "remote-exec" {
      inline = [
          "sudo chmod +x /tmp/install_jenkins.sh",
          "sh /tmp/install_jenkins.sh",
      ]
    }

    # wait for ec2 to be created
    depends_on = [aws_instance.ec2_instance]
  }

  # print the url of the jenkins server
  output "website_url" {
    value     = join ("", ["http://", aws_instance.ec2_instance.public_dns, ":", "8080"])
}- install_jenkins.sh
#!/bin/bash
sudo yum update –y
sudo wget -O /etc/yum.repos.d/jenkins.repo https://pkg.jenkins.io/redhat-stable/jenkins.repo
sudo rpm --import https://pkg.jenkins.io/redhat-stable/jenkins.io-2023.key
sudo yum upgrade -y
sudo amazon-linux-extras install java-openjdk11 -y
sudo yum install jenkins -y
sudo yum install git -y
sudo yum install python3
sudo yum install docker -y
sudo systemctl enable jenkins
sudo systemctl start jenkins
sudo systemctl status jenkins
sudo cat /var/lib/jenkins/secrets/initialAdminPassword
추가 오류났을시 실행 명령어
sudo systemctl start docker
sudo systemctl enable docker
sudo service jenkins restart
도커 권한 설정
sudo usermod -aG docker jenkins
sudo service jenkins restart
terraform 실행 명령어
terraform init
terraform plan
terraform apply →< yes
테라폼 코드가 실행되면 코드에 따라 인스턴스 내부에서 install_jenkins.sh가 실행되며 jenkins 설치에 필요한 docker , python 등 여러 리소스들이 자동으로 설치된다.
💡 Trouble Shooting - 설치시 -y 옵션
설치 명령어들중 도중에 y 혹은 yes를 입력해야 넘어가는 부분이 있는데 자동으로 y하게끔 -y 옵션을 줘야한다 주지않으면 terraform이 안끝난다.
trivy slack 연동
trivy 설치
rpm -ivh https://github.com/aquasecurity/trivy/releases/download/v0.47.0/trivy_0.47.0_Linux-64bit.rpmhttps://dnight.tistory.com/entry/Jenkins-Slack-알림-연동

)

)
)

)

)

)
💡 Trouble Shooting - 워크스페이스 이름
워크스페이스의 이름은 devops 지만 입력해야하는것은 url인 devops-lcz1131 로 입력해줘야한다.

stage('Trivy Scan') {
      steps {
        script {
          // Save the result to a variable
          trivyResult = sh(script: """
              date '+%Y-%m-%d %H:%M:%S' && trivy image --quiet --format template --template '{{- \$critical := 0 }}{{- \$high := 0 }}{{- range . }}{{- range .Vulnerabilities }}{{- if eq .Severity "CRITICAL" }}{{- \$critical = add \$critical 1 }}{{- end }}{{- if eq .Severity "HIGH" }}{{- \$high = add \$high 1 }}{{- end }}{{- end }}{{- end }}Critical: {{ \$critical }}, High: {{ \$high }}' 871065065486.dkr.ecr.us-east-2.amazonaws.com/jenkinsflask
          """, returnStdout: true).trim()

          // Print the result to the console
          echo "Trivy Scan Result: ${trivyResult}"

          // Send the result to Slack
          slackSend channel: '#devops-trivy-check', color: '#FF5733', message: "Trivy Scan Result: ${trivyResult}", teamDomain: 'devops-lcz1131', tokenCredentialId: 'slack_jenkins'
        }
      }
    }
